Free Shipping on Orders Over $75 within the Continental US

As any experienced bowhunter knows, the selection of quality arrows is as important and involved as choosing a bow. Arrows that lack exactness, strength, and accuracy of flight make Bowhunting nearly impossible. And with the dramatic equipment changes of the past decade, you have never before had such a wide selection of materials and equipment to choose from to prepare for the hunting season. Though many things have changed, one arrow material, wood, has remained popular and has proved its effectiveness with both conventional and the latest designed archery equipment. Seasoned bowhunters have always known the ideal performance characteristics of Wood Arrows, and novice bowhunters are finding that wood, the only natural choice, is an ideal arrow material for them. Without question, Wood Arrows do add much to the excitement and tradition of bowhunting. This informative booklet has been developed by your Wood Arrow Manufacturers. Besides giving you a background into the history and manufacturing of Wood Arrows, this booklet will also give you many guidelines in the use and care of Wood Arrows that will make your bowhunting season more enjoyable and rewarding.
Wood Arrow History
 As we all know, wood was the first arrow material. But its history begins hundreds of years before the use of bow and arrow for defense, survival or sport. All Wood Arrows are made from quality Port Orford White Cedar. It is this wood that gives Wood Arrows their excellent performance characteristics. Coquille Valley Port Orford Cedar has its origin in the Orient where it has always played an important part in Japanese rituals and heritage. Even today, this special cedar is considered a sacred wood, and it is traditional for every Japanese home to be constructed with at least one white cedar beam. Because of this demanding use of the cedar, the Japanese supply has all but vanished. Currently, there is only one area that offers a good supply of this natural arrow material. The Coquille Valley of Southwest Oregon is now the world's producer of the cedar.
It is theorized that thousands of years ago the warm ocean currents of the Pacific carried the cedar seeds from the Orient and washed them ashore to North America in the limited area of the Coquille Valley near Port Orford, Oregon. Fortunately, Oregon's Coquille Valley proved to be an ideal growing environment for the cedar to flourish. The moderate temperatures, ample moisture, and high mountain altitude of the coastal canyons allowed this special tree to grow slowly, straight and tall. It is this combination of slow growth and fertile soil that gives the Port Orford Cedar its fine grain necessary for arrow shaft material. The Coquille, a native Oregon Indian tribe, were the first to discover the fantastic characteristics of the cedar. They found that "downed timber" which has been naturally aged through time and forest fires, provided the best arrow shaft material. The Coquille Indians hand-made arrow shafts that were lightweight, tough yet resilient, and most importantly, straight. The Coquille were not a hostile tribe, and used their bow and arrow mainly to feed and clothe their families. In fact, many of the basic bowhunting skills that we know today for hunting elk, mule deer and blacktail deer were handed down to us from these Native Americans. It is this adventure of hunting in a traditional fashion as did archers hundreds of years ago that attracts many bowhunters today to hunt with Wood Arrows.
Wood Arrow Manufacturing Today

There are hundreds of arrow manufacturers today that produce "finished arrows" which are ready for use. But every Wood Arrow shaft is produced by one of three manufacturers in the Coquille Valley which supplies these superb shafts to the entire world. These manufacturers are Acme Wood Products of Myrtle Point, Norway Archery of Norway, and Rose City Archery of Powers, Oregon (now located in Myrtle Point, OR.). Each of these manufacturers produce the Wood Arrow shaft in much the same manner. Matched arrows shoot more accurately.
The process begins with the selection of naturally aged Port Orford Cedar. Choice logs which have been downed for several hundred years are brought to the arrow shaft plant. Having been cured by Mother Nature and occasional forest fires, gives the cedar its toughness, lightweight, and resilience. The wood is first cut into four-inch planks called "cants". The cants have a thickness that is slightly larger than the finished arrow shaft diameter. After being stacked on drying racks, the cants are transported into drying ovens for a "finish cure" on the wood. Even though the naturally cured wood has been dead for hundreds of years, the moist climate of the region allows the wood to maintain a twenty percent moisture content when it is chosen for shaft production. This moisture must be reduced to as little as seven percent before shaft production can continue. The low-humidity, ninety-degree temperature of the drying ovens rids the wood's capillary system of the excess moisture. Within four to six days the wood has been dried to the correct moisture content. This may seem to be a lengthy task to rid the wood of moisture, but this slow, traditional drying method keeps the wood resilient and useable by the bowhunter After leaving the drying ovens, the cants are hand-inspected for flaws in the wood grain. Only wood that has consistent, fine grain is used to make arrow shafts. After this inspection, the selected wood is then separated into squares and is ready for the doweling process which gives the wood the correct diameter and notable natural sheen. (One doweling process seals the wood prior to cutting, but the end result is much the same.) From doweling, the shafts are again inspected for flaws guaranteeing you of the best quality Wood Arrows. At this point, full grading takes place and the arrows are separated for spinning.
How Spine Weight Affects Arrow Flight!

The spine weight, or "stiffness" of the shaft is the most important characteristic of the arrow shaft. Wood Arrows are spined both automatically and manually. The average dozen arrows with the same spine weight will not vary more than plus or minus five pounds, and that difference is sometimes hard to notice for the bowhunter. Unlike aluminum, fiberglass or carbon shafts, the spine weight of Wood Arrows is virtually natural and cannot be "manufactured". the spine weight is solely determined by the size of diameter of the shaft and the density of the wood. Top grade Wood Arrows have small diameters and high spine weights. But since the advent of the compound bow, the larger diameter and high spine weight arrow shafts have been of high demand. These shafts not only give bowhunters the necessary spine weight, but they also provide acceptable mass weight which is so important for penetration power. There are three sizes of diameter in which cedar shafts are produced. They are 5/16, 11/32, and 23/64- inch diameters. The latter two sizes are the most popular. Wood Arrows are available in spine weights from twenty to seventy pounds.
How To Determine Arrow Shaft Size
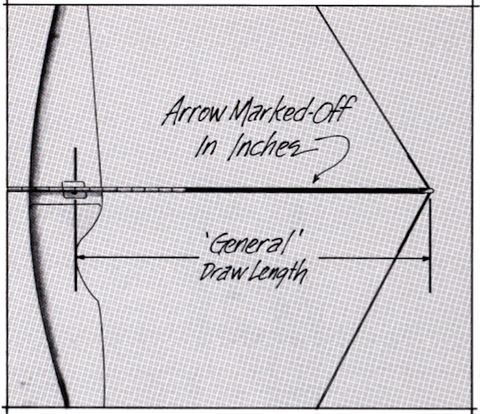
When choosing an arrow shaft, you must find a shaft that matches your draw length and spine weight needs. To determine your draw length, you must measure the distance at full draw from the nocking point on the string to the back of the bow. This measurement is your general draw length. (General draw length differs from the standard draw length that manufacturers use to weigh and mark bows.)
Measuring Draw Length
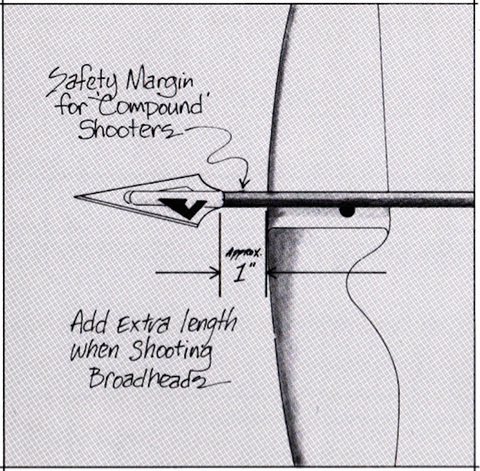
Update Note from Jerry Dishion: When this booklet was written it did not take into account the fact that all bows are not created equal. The proper way to calculate your draw length is measuring from the throat of the nock to the back of the bow (farthest part away from you) at full draw. The purpose of draw length measuring is to give you appropriate clearance between your arrowhead and the bow for proper aiming and shooting while ensuring that the arrow isn't excessively long. If you are using your finger as an arrow rest, extra length should be considered for comfort as well.
The spine weight which is best suited for you is determined by the draw weight of the bow that you are shooting. If you are shooting a Recurve bow, your arrow spine weight should match the draw weight of your bow at full draw. If you are shooting a compound bow, your arrow spine weight should match your peak bow weight rather than the full draw let-off weight. It is very important that your arrows have the correct spine weight or stiffness for your bow's draw weight at your draw length. Your equipment must be matched. If your arrows are too stiff or not stiff enough they will not fly properly. After determining your draw length and spine weight, you can refer to the arrow spine charts to choose the correct shaft. If you have yet to choose your bow or draw weight, always remember to pick a draw weight that is easy for you to handle. The ideal draw weight is the heaviest you can handle, coming to full draw and holding and aiming well for shot after shot. Also, it is better to have a longer arrow than one too short- for broadhead safety and shoot ability.
From Shaft To Finished Arrow
Today's bowhunter has three buying options for Port Orford Cedar Arrows. First, you can purchase finished arrows "ready to shoot" at hundreds of pro shops and dealers across the nation. Second, there are arrow kits available that include treated shafts and all components needed to complete the arrows. Third, you can purchase the standard shaft from a Wood Arrow distributor or dealer, selectively buy the arrow components which best suit your hunting style, and produce your own "home-made" arrows. Many bowhunters find the third option most satisfying. Making your own arrows is very traditional and can be very rewarding, not to mention the extreme pride that can be obtained by having a quiver full of arrows that you personally made. Making arrows does take quite a bit of time and effort. Every component must be attached to the shaft with extreme care so that you can have maximum performance out of the finished product. To make your own Port Orford Cedar Arrows, you must first cut the shaft to accommodate your draw length.
Shafts are manufactured and distributed at thirty-two inches in length and they must be shortened to accommodate most bowhunters. Cut the shaft the length of your draw plus one inch allowing the extra length for tapering at the point end. If the shafts that you are using are not sealed, they must be given a sealer coat of clear lacquer or color rather than just painting them. The idea is to totally immerse the shaft into the solution to get full penetration into the wood. Automotive lacquers can be used for the dipping, but keep in mind your future use of the arrows. You may want your own personal color identification, but if you are going bowhunting, it may be wise to stick to drab camouflaged colors. If the paint or lacquer that you use leaves a shiny lustre, you can lightly buff or rub the shaft with steel wool to remove this sheen.
Next. you must ready the shaft for a point or broadhead and nock. By using a tapering tool (one can be purchased for a few dollars from a pro shop) you must cut a five-degree taper on the end of the shaft. Go to the other end of the shaft and do likewise for the nock, using a ten-degree tapering tool. Your next step is to determine the grain of the wood. The edge of the grain should be against the bow window since the edge gives you maximum spine weight. It is also important that each shaft's grain is located in the same manner so that you have consistent spine weight and arrow flight between shafts. After locating the edge of the grain, cement the nock on the end of the shaft with the nock "notch" running perpendicular to the wood grain. Without a doubt, it is a good investment to purchase a good gluing or fletching cement for your arrow making. Your pro shop can offer you some excellent suggestions. Simple household glue will not work effectively. The secret to nock installation is to use the fletching cement sparingly. Place a few drops of cement on the tapered tip, apply the nock and rotate the shaft slowly making sure the cement is spread evenly. Take care to seat the nock in straight alignment.

Your next step will be to fletch the arrows. There are two commonly used materials for fletching, feathers and plastic vanes. Both have their advantages and disadvantages, and it is up to the personal shooter to determine which fletching material is best for him. Feathers are most forgiving of errors in shooting form and cause the least clearance problems on cables, arrow rest or bow sight window. They are very consistent in flight and create a better "air drag" for arrow control. Also, they can be shot off the bow window. But, feathers must be waterproofed for rainy weather and they can be noisy bowhunting. Plastic vanes are fully waterproofed and tougher. But, they are less forgiving, don't straighten the arrow out as quickly upon release, and can cause severe problems with cable and arrow rest clearance. A bow must be "tuned" for vane arrow flight.
Once you have chosen the fletching material, you must choose the type of fletching, and again, it is usually decided upon personal preference. According to the Archery Manufacturers Organization's Fletching Standards, three vane or feather fletching must have a minimum length of five inches and maximum height of five-eighths of an inch. Four vane or feather fletching must have a maximum length of four inches and a maximum height of five-eighths of an inch. These are the standards that the arrow manufacturers follow, and are good guidelines for home fletchers to follow. Also, you might keep in mind, four fletch is impossible to nock wrong. Accurate broadhead flight requires adequate fletching for guidance. True spiral fletching, or helical, is recommended for hunting broadheads. Diagonal fletch is limited to the arrow shaft diameter and to the amount of rotation it can produce and subsequently has less guidance effect. Also, excess spiral (where the arrow has to travel less than two and one-half feet per revolution) creates excessive drag or deceleration, wind drag, and surface noise.
Vanes or feathers are attached to the prepared shaft with a fletching machine. Place the nocked shaft into the fletcher and index it to the correct position. Place a vane or feather in the fletcher clamp and align it with a position mark to insure consistent location. Apply a thin coating of fletching cement to the base surface of the vane or feather. Place the clamp against the face of the magnet which will hold the clamp in place while you push it downward pressing the vane or feather against the shaft. Close the clamp carefully and allow for a drying time of at least fifteen minutes before continuing to the next feather or vane. Repeat this process until all the vanes or feathers are fletched. Next, drop a spot of cement on the leading and trailing edge of each vane or feather. This will further seal the fletching to the shaft and prolong the fletching life. To attach a field point or broadhead to your arrow, use a ferrule cement that is heated to form the adhesion between shaft and point. When finished, always check for accurate alignment of all components.
Shooting Your Wood Arrows

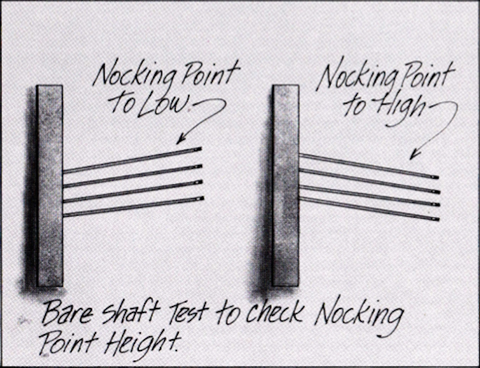
One simple method in bow tuning is to have a friend watch the arrow flight as you shoot. First, you should Testing nock point on bow measure your nocking point location with a bow square. the standard nocking point should be five-sixteenths above square. Next shoot your bow and if your friend observes the arrow tailing in one direction (up or down), move your nocking point slightly in the other direction, i.e., if the arrow tails upward during flight, the nocking point should be lowered. If the arrow leaves the bow "nock left", then the arrow rest should be moved right if possible, and to the left if the arrow leaves the bow "nock right". After some trial and error, you will have your bow set-up and tuned for shooting.
 Another easy way to tune your bow is to follow the above procedure but to shoot "bare" or unfletched shafts into a close range target. The shot arrows will show the angle of tailing in the target.
Caring For Your Wood Arrows
Even though Wood Arrows are the least costly arrows for bowhunters to use, you will still want to take good care of them and get full life out of them. Wood Arrows should be stored in a vertical position so that the forces of gravity are parallel to the length of the shaft. Never store your arrows in your quiver. Feathers can become matted and plastic vanes may become wrinkled. If your Wood Arrows do show a visible bend, it is easy to straighten them. If you are bowhunting, simply "eye the length of the shaft and remove the bend with wrist movement by bending the shaft in the opposite direction. This straightening can last until the shaft is shot. For a more permanent straightening, use steam from a tea kettle on the arrow shaft. Also, you can let gravity straight your arrow by storing the bent shaft horizontally with the bend sticking up. Eventually, the bend will diminish. Good form with your bow gets good results It is also important to care for your arrows in use. Shoot your arrows in only appropriate backstops. Use care in pulling your shot arrows from targets. And always remember that your arrows protrude from your quiver when moving through trees or brush. Before shooting your arrows, always examine the shaft for breaks or cracks that may make the arrow unsafe when shot. Broadheads should be kept properly aligned and razor sharp. Keep them coated with oil to displace moisture and protect against rust. It may be a wise investment to purchase broadhead covers for safety's sake. Nocks should periodically be checked for cracks Any nock with a crack in the base, ears, or mouth should be replaced. This is also a good time to check the nock fit on the bowstring. Pinch nocks should not be too tight or too loose. Also check to see if the nock rotation is the same on all arrows. Any fletching that is torn, damaged or unglued should be replaced. Ruffled or matted feathers may be smoothed out by steaming over a kettle. And it is also a good idea to waterproof your feathers prior to bowhunting.
Bowhunting With Wood Arrows

You have chosen an ideal arrow for bowhunting. Wood Arrows are quiet, lightweight, tough, and a whole lot cheaper than any other arrow material. They are ideal for both stump shooting and big game hunting. Both bowhunters who shoot Recurve and compound bows have excellent results with Wood Arrows. But no matter how good your equipment is, it is you, the bowhunter, who is using it. If you expect top performance out of your equipment, then you must perform at your best, also. Port Orford Cedar Wood Arrows Practice extensively before hunting season. Restrict yourself to high percentage shots-usually within thirty yards. Practice this yardage with broadhead weight arrows until your are proficient. Practice shots you will shoot while hunting such as tree stand shots, from a blind, etc., and try to practice with a life-size target so you become familiar with the aiming spot and judging distance. And above all, respect the rights of land owners, other hunters, and nature.
Good Bowhunting
We hope this small booklet has added some information and enjoyment to your bowhunting. If you have any further questions about Wood Arrows, your pro shop dealer can be your best friend. No one else offers as superior or complete facilities combined with equipment knowledge as does your local dealer. From coaching to equipment purchases, he is the man to see. He is always there in the time of need. The Wood Arrow Manufacturers thank you for choosing Wood Arrows for this bowhunting season. You are one of thousands of bowhunters who enjoy bowhunting at its fullest, shooting the only natural and traditional arrow shaft material - Wood Arrows!
Subscribe to our newsletter and always be the first to hear about what is happening.
© 2026 Rose City Archery


